文章已收录到我的Github精选,欢迎Star:https://github.com/yehongzhi/learningSummary
介绍服务网关
要认识一样东西,最好的方法是从为什么需要他开始说起。
按照现在主流使用微服务架构的特点,假设现在有A、B、C三个服务,假如这三个服务都需要做一些请求过滤和权限校验,请问怎么实现?
- 每个服务自己实现一遍。
- 写在一个公共的服务,然后让A、B、C服务引入公共服务的Maven依赖。
- 使用服务网关,所有客户端请求服务网关进行请求过滤和权限校验,然后再路由转发到A、B、C服务。
第一种方式显然是逆天的,这里不做讨论。第二种方法稍微聪明点,但是如果公共服务的逻辑发生改变,那么所有依赖公共服务的服务都需要重新打包部署才能生效。
所以显而易见,使用服务网关则解决了以上的问题,其他服务不需要加入什么依赖,只需要在网关配置一些参数,然后就能路由转发到对应的后端服务,如果需要请求过滤和权限检验的话,都可以在网关层实现,如果需要更新权限校验的逻辑,只需要网关层修改就可以,其他后端服务不需要修改。
接下来再介绍一下服务网关的功能,主要有:
- 路由转发
- API监控
- 权限控制
- 限流
所以服务网关很重要!那么接下来我们就以目前比较主流的GateWay进行学习吧。
GateWay入门
首先第一步需要创建一个作为网关的项目,这里使用的SpringBoot版本是2.0.1,引入依赖:
org.springframework.cloud
spring-cloud-starter-gateway
org.springframework.cloud
spring-cloud-dependencies
Finchley.SR1
pom
import
我们需要使用网关转发请求,那么首先需要有个后端服务,这里我简单地创建了一个user项目。然后启动user项目,写个获取所有用户信息的接口:

那么我们现在配置网关的application.yml实现请求转发。
server:

port: 9201

spring:

application:

name: api-gateway

cloud:

gateway:

routes:

- id: user_getList #路由的ID

uri: http://localhost:8080/user/getList #最终目标的请求地址

predicates: #断言

- Path=/user/getList #路径相匹配的进行路由
也就是说我请求http://localhost:9201/user/getList后,9201端口是网关服务,会匹配/user/getList的路由,最终转发到目标地址http://localhost:8080/user/getList。

这就算是gateway网关的简单使用了。
继续深入
在上面入门的例子中,我们注意到有个predicates的配置,有点对其似懂非懂的感觉。中文翻译过来叫做断言,有点类似于Java8的Stream流里的Predicate函数的意思。如果断言是真的,则匹配路由。
除此之外,gateway的另一个核心是Filter(过滤器),Filter有全局和局部两种。那么整个gateway的流程是怎么样的呢?请看下图:
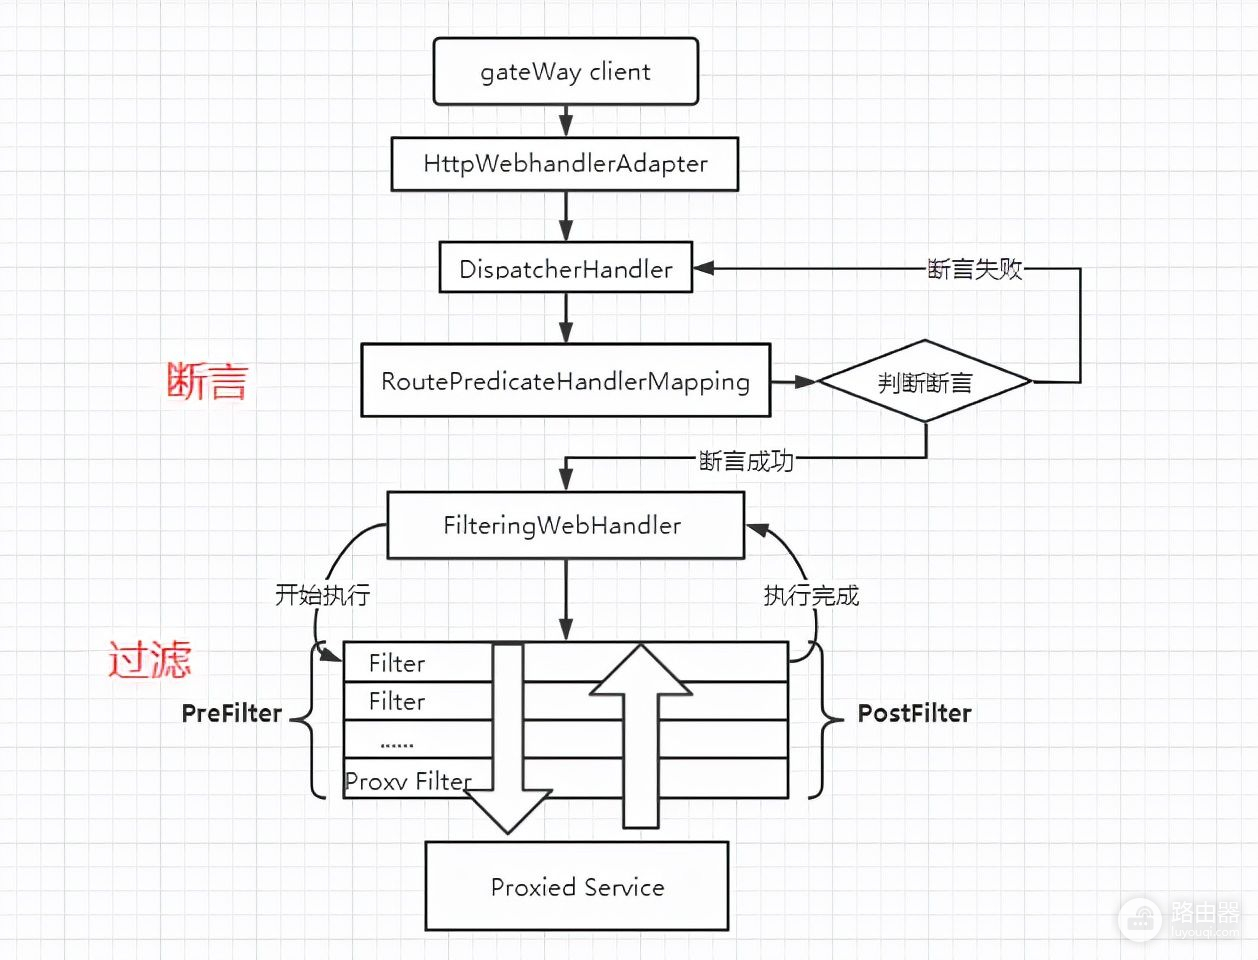
从图中可以看出,gateway的两大核心就是断言(Predicate)和过滤(Filter),接下来我们重点讲讲这两者的使用。
Route Predicate 的使用
Spring Cloud Gateway包括许多内置的Route Predicate工厂,所以可以直接通过配置直接使用各种内置的Predicate。
After Route Predicate
在指定的时间之后请求匹配该路由。
spring:

cloud:

gateway:

routes:

- id: user_getList

uri: http://localhost:8080/user/getList

predicates:

- After=2021-10-30T01:00:00+08:00[Asia/Shanghai]
Before Route Predicate
在指定时间之前的请求会匹配该路由。
spring:

cloud:

gateway:

routes:

- id: user_getList

uri: http://localhost:8080/user/getList

predicates:

- Before=2021-10-30T02:00:00+08:00[Asia/Shanghai]
Between Route Predicate
在指定时间区间内的请求会匹配该路由。
spring:

cloud:

gateway:

routes:

- id: user_getList

uri: http://localhost:8080/user/getList

predicates:

- Between=2021-10-30T01:00:00+08:00[Asia/Shanghai],2021-10-30T02:00:00+08:00[Asia/Shanghai]
Cookie Route Predicate
带有指定Cookie的请求会匹配该路由。
spring:

cloud:

gateway:

routes:

- id: user_getList

uri: http://localhost:8080/user/getList

predicates:

- Cookie=username,yehongzhi
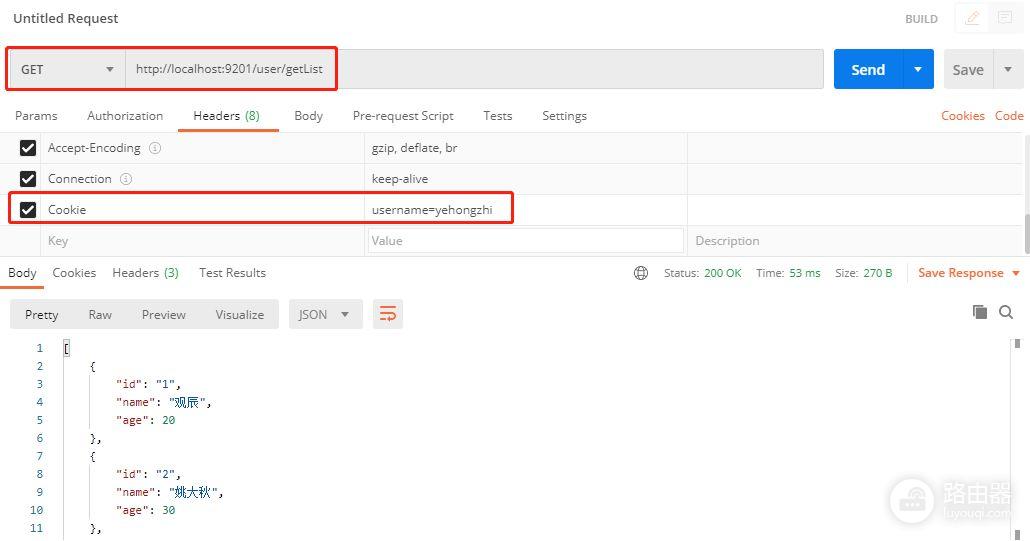
使用POSTMAN发送带有Cookie里username=yehongzhi的请求。
Header Route Predicate
带有指定请求头的请求会匹配该路由。
spring:

cloud:

gateway:

routes:

- id: user_getList

uri: http://localhost:8080/user/getList

predicates:

- Header=X-Id, \d+
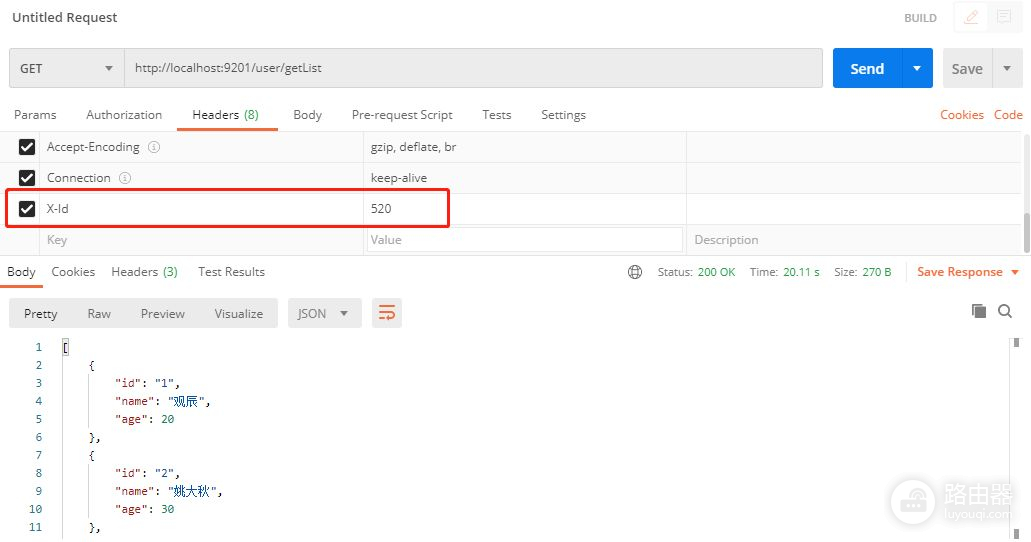
使用POSTMAN发送请求头带有X-Id的请求。
Host Route Predicate
带有指定Host的请求会匹配该路由。
spring:

cloud:

gateway:

routes:

- id: user_getList

uri: http://localhost:8080/user/getList

predicates:

- Host=**.yehongzhi.com
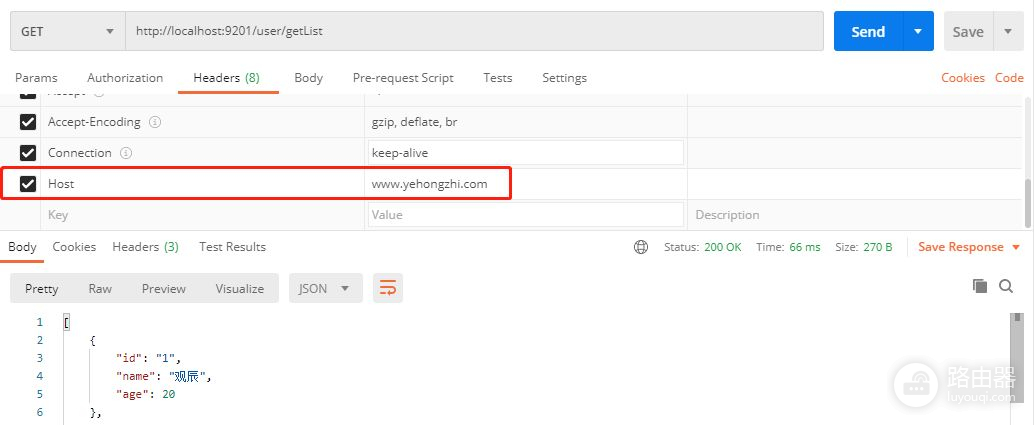
使用POSTMAN发送请求头带有Host=www.yehongzhi.com的请求。
Path Route Predicate
发送指定路径的请求会匹配该路由。
spring:

cloud:

gateway:

routes:

- id: user_getList

uri: http://localhost:8080/user/getList

predicates:

- Path=/user/getList
直接在浏览器输入该地址http://localhost:9201/user/getList,即可访问。
Method Route Predicate
发送指定方法的请求会匹配该路由。
spring:

cloud:

gateway:

routes:

- id: user_getList

uri: http://localhost:8080/user/getList

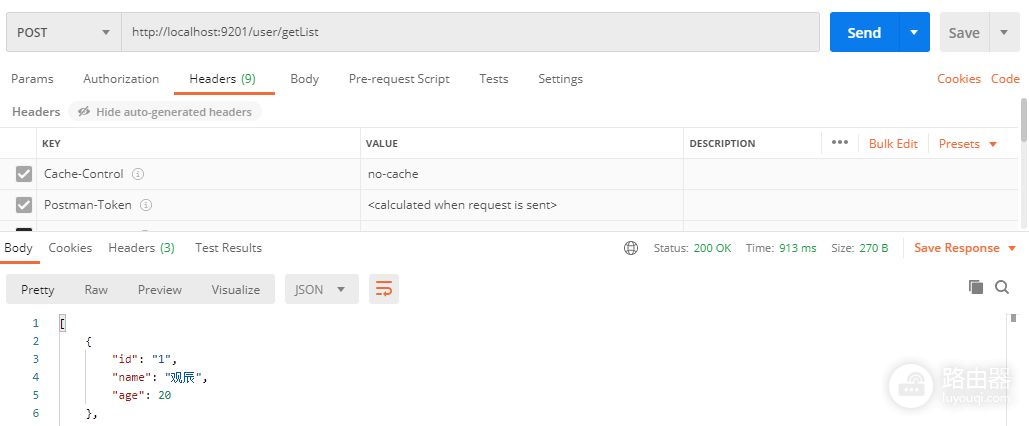
predicates:

- Method=POST
用POSTMAN以POST方式发送请求。
Query Route Predicate
带指定查询参数的请求可以匹配该路由。
spring:

cloud:

gateway:

routes:

- id: user_query_byName

uri: http://localhost:8080/user/query/byName

predicates:

- Query=name
在浏览器输入http://localhost:9201/user/query/byName?name=tom地址,发送请求。

Weight Route Predicate
使用权重来路由相应请求,以下配置表示有80%的请求会被路由到localhost:8080,20%的请求会被路由到localhost:8081。
spring:

cloud:

gateway:

routes:

- id: user_1

uri: http://localhost:8080

predicates:

- Weight=group1, 8

- id: user_2

uri: http://localhost:8081

predicates:

- Weight=group1, 2
RemoteAddr Route Predicate
从指定的远程地址发起的请求可以匹配该路由。
spring:

cloud:

gateway:

routes:

- id: user_1

uri: http://localhost:8080/user/getList

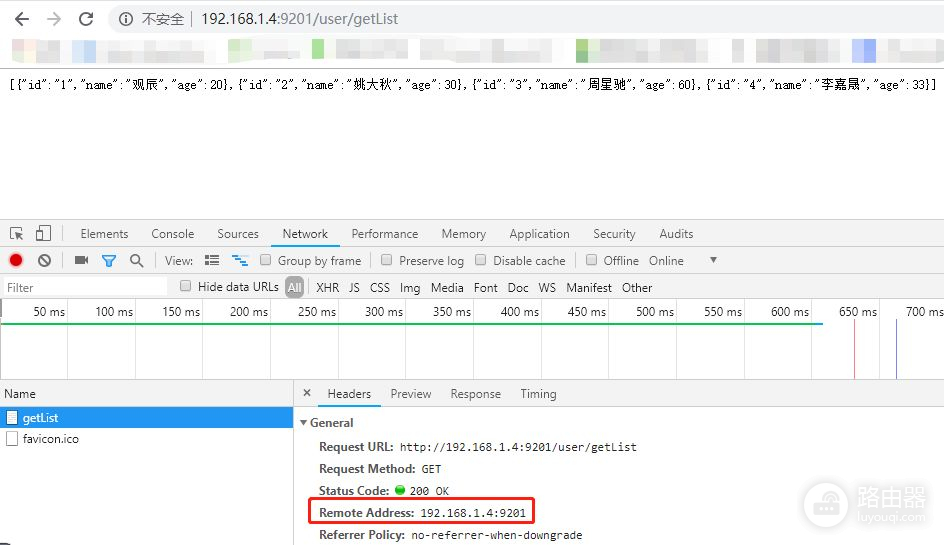
predicates:

- RemoteAddr=192.168.1.4
使用浏览器请求。
组合使用
spring:

cloud:

gateway:

routes:

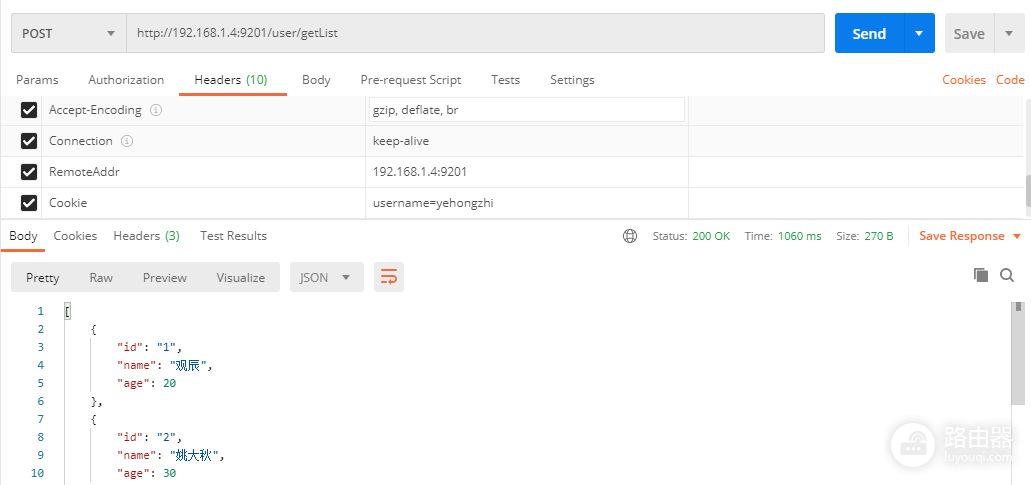
- id: user_1

uri: http://localhost:8080/user/getList

predicates:

- RemoteAddr=192.168.1.4

- Method=POST

- Cookie=username,yehongzhi

- Path=/user/getList
使用POSTMAN发起请求,使用POST方式,uri是/user/getList,带有Cookie,RemoteAddr。
自定义Predicate
如果我们需要自定义Predicate,怎么玩呢?其实很简单,看源码,有样学样,需要继承AbstractRoutePredicateFactory类。
下面举个例子,需求是token值为abc的则匹配路由,怎么写呢,请看代码:
@Component

public class TokenRoutePredicateFactory extends AbstractRoutePredicateFactory {

public static final String TOKEN_KEY = "tokenValue";

public TokenRoutePredicateFactory() {

//当前类的Config类,会利用反射创建Config并赋值,在apply传回来

super(TokenRoutePredicateFactory.Config.class);

}

@Override

public List shortcutFieldOrder() {

//"tokenValue"跟Config的接收字段一致

return Arrays.asList(TOKEN_KEY);

}

@Override

public Predicate apply(Config config) {

//这里获取的config对象就是下面自定义的Config对象

return new Predicate() {

@Override

public boolean test(ServerWebExchange exchange) {

MultiValueMap params = exchange.getRequest().getQueryParams();

//获取请求参数

String value = params.getFirst("token");

//请求参数和配置文件定义的token进行对比,相等则返回true

return config.getTokenValue() != null && config.getTokenValue().equals(value);

}

};

}

//用来接收配置文件定义的值

public static class Config {

private String tokenValue;

public String getTokenValue() {

return tokenValue;

}

public void setTokenValue(String tokenValue) {

this.tokenValue = tokenValue;

}

}

}
这里需要注意的一点是类名必须是RoutePredicateFactory结尾,前面的则作为配置名。比如TokenRoutePredicateFactory的配置名则为Token,这是一个约定的配置。
接着在配置文件中加上该配置:
spring:

cloud:

gateway:

routes:

- id: user_1

uri: http://localhost:8080/user/getList

predicates:

- Token=abc ##使用TokenRoutePredicateFactory进行断言
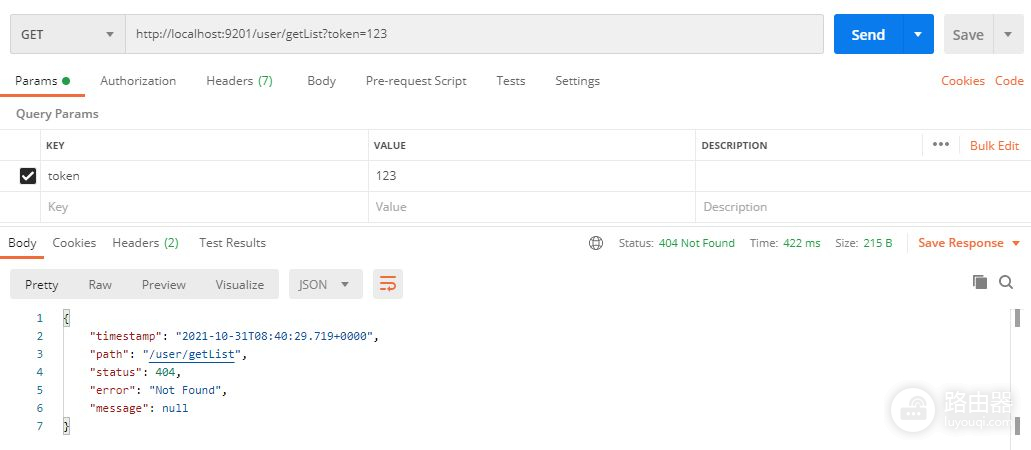
然后用POSTMAN发送请求,带上token参数,参数值为abc。
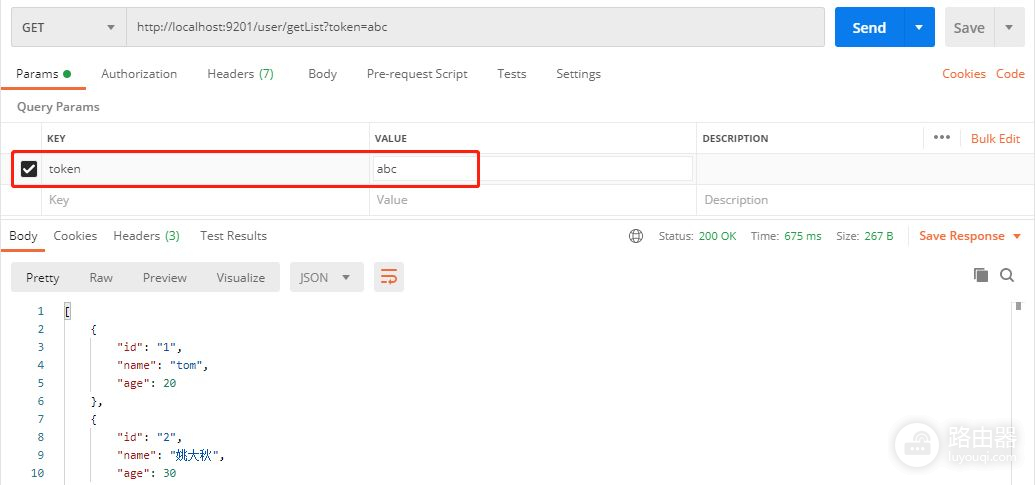
如果token的值不正确的话,会报404。
整合注册中心
为什么要整合注册中心呢?因为每个服务一般背后都不只一台机器,而且一般使用服务名进行配置,而不是配置服务的IP地址,并且要实现负载均衡调用。
这里我就使用Nacos作为注册中心。
引入Maven依赖:
org.springframework.cloud

spring-cloud-starter-alibaba-nacos-discovery
org.springframework.cloud
spring-cloud-dependencies
Finchley.SR1
pom
import
org.springframework.cloud
spring-cloud-alibaba-dependencies
0.2.2.RELEASE
pom
import
启动类加上注解,开启注册中心。
@SpringBootApplication

@EnableDiscoveryClient

public class GatewayApplication {

public static void main(String[] args) {

SpringApplication.run(GatewayApplication.class, args);

}

}
在application.yml加上配置:
spring:

application:

name: api-gateway

cloud:

nacos:

discovery:

server-addr: 127.0.0.1:8848

service: ${spring.application.name}

gateway:

routes:

- id: consumer

uri: lb://consumer #使用lb协议,consumer是服务名,不再使用IP地址配置

order: 1

predicates:

- Path=/consumer/** #匹配/consumer/**的请求路径

server:

port: 9201
创建一个consumer也注册到nacos,并提供一个接口:
@RestController

public class ConsumerController {

@Value("${server.port}")

private String port;

@RequestMapping("consumer/getDetail/{id}")

public String getDetail(@PathVariable("id") String id) {

return "端口号:" + port + ",获取ID为:" + id + "的商品详情";

}

}
启动consumer和gateway两个项目,然后打开nacos控制台,可以看到两个服务。

连续请求地址http://localhost:9201/consumer/getDetail/1,可以看到实现了负载均衡调用服务。


可能有人会觉得每个服务都要配一个路由,很麻烦。有个很简单的配置可以解决这个问题:
spring:

gateway:

discovery:

locator:

enabled: true
然后启动服务,再试一次,请求地址需要加上服务名,依然没有问题!

写在最后
这篇文章主要介绍GateWay的路由转发功能,并且整合了注册中心。权限控制可以用过滤器实现,由于篇幅有点长,过滤器放到下一篇文章了,感谢大家的阅读。
觉得有用就点个赞吧,你的点赞是我创作的最大动力~
我是一个努力让大家记住的程序员。我们下期再见!!!
能力有限,如果有什么错误或者不当之处,请大家批评指正,一起学习交流!

